
Near the end of August Belleza finally got round to updating their mesh bodies to what is now the 3.0 version. There was no automatic redelivery and as I don’t always keep my ear to the ground (it’s such an awkward position) I only found out about it a couple of weeks into September. Oh well, never mind. I got my update now, so I’m using this as an opportunity to go over the basics of putting together an avatar with this particular mesh body.
I suggest that first you get yourself down to one of the classic standard avatars. Then you start stripping til you can’t remove anything else. You’ll be left with a shape, skin, eyes and brow shape. For the next step you are already faced with a choice. You can either use a BOM skin, in which case you do not need to wear an alpha layer. Alternatively you can use an applier skin on the mesh body and in that case, you will need to wear an alpha layer to hide the so called system body. Let’s look at the BOM option first.

Put on Belleza Jake V3 BOM/BENTO and Belleza Jake Body HUD V3, by right-clicking each item and choosing “add”. The body has been set to BOM mode by default, so what you are seeing here know is the skin of the standard avatar “Baked” On the Mesh body… Aaaaah, that’s what BOM means! As it happens, the shape of the classic avatar I’m using doesn’t make the body look too weird. Sometimes at this stage you end up with something that will make you pause to savour the moment, a.k.a. laughing so hard you can’t breath. In any case you can of course edit your shape till it’s just how you like it and if you find shape editing too much of a kerfuffle, you can always shop around for one. Usually shapes are made for a specific mesh head and will include versions for different mesh bodies. My own shapes are usually for a specific combination of mesh head and body, but I find that often a shape I made for the Legacy mesh body, also looks good with Belleza. I believe Tivoli is a particularly popular shape creator, at least that’s the impression I got from anything I’ve watched on Boston Blaisdale’s Youtube channel. As I always make my own shape, I can’t spontaneously name any other shape creators. I do know that often when you buy a skin for a mesh head, it will include a shape for a particular head. If you look closely at a poster for a skin, it will probably tell you which head it’s shown on.

Now that I have touched on skins and mesh heads, it’s time to start using them. Today I’m choosing the Lelutka Skyler mesh head. If you are new to Lelutka, it might be interesting to know that you’ll find two male mesh heads from their older range slightly tucked away in a corner, named Guy and Andrea. Although these two can be used with BOM skins, they were originally created to be used with appliers. I realise that for the totally uninitiated this will all sound somewhat bewildering, but bear with me here. In a later stage Lelutka started created a new line of mesh heads, naming it their Evo line. Their most recent development has been from Evo to Evo X, using a different method to map skin onto the head.
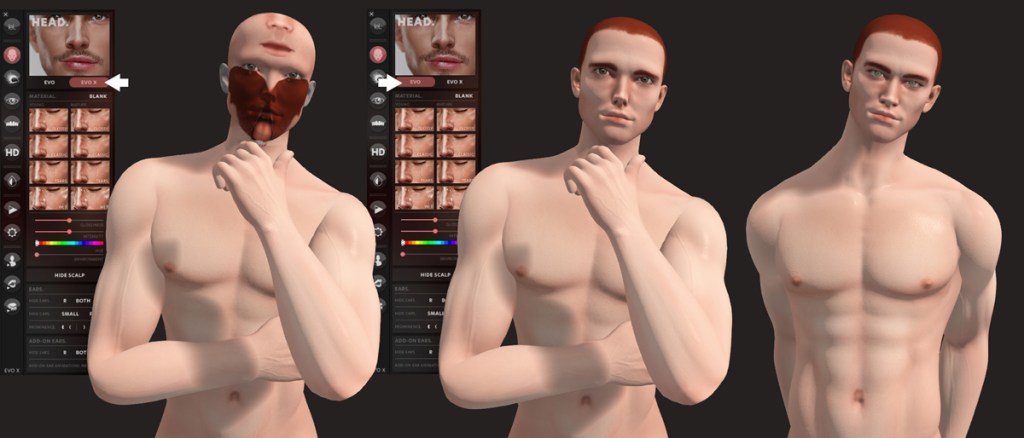
Because the Evo X heads use this specific way of mapping the skin and also because the shape of your standard avatar most probably will not be very suitable for the mesh head, when you first put on the Lelutka Skyler mesh head, your avatar is going to look well messy. Don’t worry, Lelutka’s got you covered. In the HUD for this head you’ll find buttons to switch between Evo and Evo X. To get the look you see on the right in the above image, you need to add the following items to your outfit (always right-click and choose add). I’ve used the exact naming as shown in the folder for the head.
- /HEAD/ lel EvoX SKYLER 3.1
- /HUD/ lel EvoX (m) 3.1
- /EYES/ lel Evo 3.1
- /TEETH/ LeLUTKA 3.1
- SHAPE Default lel EvoX SKYLER
- SHAPE Brow lel EvoX SKYLER
- ALPHA (BOM Head + Body – APPLIER Eyes)

If at this point your eyes are just empty red sockets, it means that they are set to BOM. There are two things you can do. You can remove ALPHA (BOM Head + Body – APPLIER Eyes) from your outfit and the eyes of the standard avatar will be baked on the mesh eyes that come with the body (sounds kinda painful!). You can also leave that alpha on and click on one of the eye textures in the HUD, which is what I have done here. This avatar is coming along nicely already and we haven’t even looked at skins yet. The standard avatar skins are quite bland and lacking in detail, but luckily there are lots of options available from various skin creators for the combination of the Belleza Jake mesh body and Lelutka mesh heads.
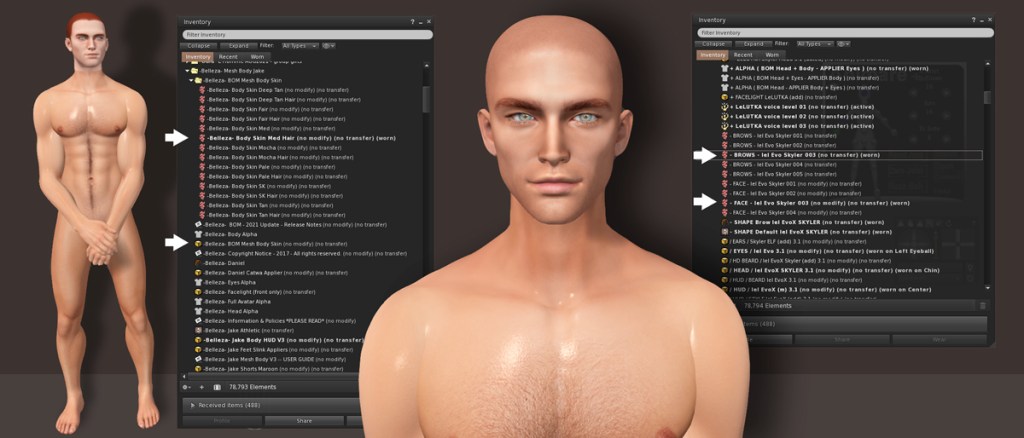
Before you head out to purchase a skin, you may want to look at the options that come with the Belleza Jake mesh body and Lelutka Skyler mesh head. In the folder for the Jake body you will find an item named Belleza BOM Mesh Body Skin. Unpack this item and you’ll get a folder with 14 skins, consisting of 7 skin stones, each one in a smooth and hairy version. I chose the “Med Hair” version here. Now go back to the folder for your Lelutka mesh head and look for the four BOM skins, named “FACE lel Evo Skyler 001” to 004. I’m using 003 here, which seems to match up naturally with the body skin. I don’t think this would have been possible with the previous version of the Belleza body, but because the BOM skins have been made to blend into each other, you don’t get an ugly seam on your neck. If you’re still pretty new to Second Life™ (hello, welcome, have fun, please don’t be scared), you might think: “so what?”. But if you’ve been knocking around here for a while, the absence of a neck seam is a blooming halle-forking-lujah moment! Next you can add your eyebrows which ar also available from the Skyler folder. The fun doesn’t stop here yet with the addons. Go ahead and unpack all the items in the Lelutka head folder that have a name that starts with “unpack” and I’ll see you on the other side.

As we’re working with an Evo skin here (not Evo X), we can only use ADDONS – LeLUTKA Classic BOM (m) and HAIRBASES – LeLUTKA Classic BOM. I’ve added:
- LeLUTKA.Freckles.004
- LeLUTKA.Eye Dusky.Mid
- LeLUTKA.Hairbase.001.Red (m)
I also added the HD Beard, which comes with it’s own HUD for changing the style and colour of your facial hair. This is one way of wearing a beard. You can also wear a bom layer without using the HD beard.

Make sure to take a look in the HUD for your Lelutka head, as you will find even more options there like a subtle lip gloss, a smokey eye, an eyebrow scar, longer lashes, different teeth, etc. Here you can also change the angle of your ears and of course this is where you will find all the animations. You can find a detailed user guide on Lelutka’s website.

You may have noticed in some of the shots that my body was looking rather shiny. This is something you can adjust in the Belleza HUD. In the Skin tab you will find a button to turn the “materials” on and off. This is the N button. When it’s turned on you’ll notice that your skin looks more bumpy. Note that Advanced Lighting Model needs to be switched on in the graphics settings of your SL viewer or you won’t see the difference. The button with the sparkles turns your skin gloss on and off. You can use the Gloss and Environment sliders to make the effect less or more dramatic. The visibility of these effects also depends on the WindLight™ you’re using.

The Alpha tab is an important one when you want to wear clothing. Some items will just fit, others may have an auto-hide function built-in. These means when you put on that item of clothing, any parts of your body that might go through it, will automatically be hidden. If this not happening, you can manually click areas of your body on the mannequin in the HUD to make them invisible. You can then save this for future use if you want. It’s also possible to create your own auto-hide for specific outfits with a kit that’s available at the Belleza store.
That just about covers the basics. I found a video about the Belleza HUD on Youtube. It’s quite old, but the HUD hasn’t changed much since then, so you still may find it useful. The Belleza Jake mesh body currently is 50% off, so it’s L$1,500 and the Lelutka Skyler mesh head is L$3,990. So to repeat my exercise (not including the clothing) you’ll need L$5,490.
If you’re going for a more unique look, you’ll have to spent some money on a skin, hair and eyes. If you purchase an Evo X skin, you’ll be able to use many more add-ons that come with the Lelutka head. Changing your shape will make a big difference as well. You can either make your own shape or purchase one. Shapes usually come with a detailed notecard telling you which skin etc. to use if you want to resemble the poster image for the shape. Many skins also include a shape for a particular mesh head. In most, if not all cases, the shape will be modifiable, so if you like the look of one but want to make some “cosmetic” changes, then that’s perfectly possible. I do advise to make a copy of the shape first before you start editing. There is always the option to use “save as” once you’ve made a change, but there’s the danger of forgetting about that and clicking the save button instead, losing the original in the process. Then again, most stores offer redelivery, so it won’t be a disaster.
That it’s for now folks! I think my next blog post will be with the Belleza Jake and Lelutka Skyler mesh head with a shape and look I’ve created for it.
If you’ve found this blog post informative and enjoyable and would like to support me with my Second Life endeavours, you can become a Patron and you can cancel your subscription at any point. I regularly add some extra pictures there for Patrons’ eyes only.


Leave a comment